一、概述
1、简介
RabbitMQ作为AMQP高级消息队列协议的成熟实现,已经被像Openstack等许多大型项目所采用。本文以Java客户端为例,介绍RabbitMQ的点对点简单队列、多消费者的工作队列、发布/订阅、路由、主题、RPC远程调用6种常用场景。本文主要翻译自RabbitMQ用户文档,英文原文请访问这里。
2、快速部署
CentOS 7环境下rabbitmq环境的Yum快速安装及配置如下:
|
1 2 3 4 5 6 |
# yum install -y https://dl.fedoraproject.org/pub/epel/epel-release-latest-7.noarch.rpm # yum install -y erlang rabbitmq-server # systemctl start rabbitmq-server && systemctl enable rabbitmq-server # rabbitmqctl add_user openstack 123456 # rabbitmqctl set_permissions openstack ".*" ".*" ".*" # rabbitmqctl cluster_status |
二、常用场景及使用
1、简单队列场景
简单的点对点模式,需要了解生产者、消费者、消息队列的基本概念。
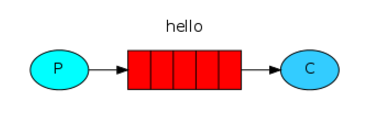
SimpleSend代码如下:
|
1 2 3 4 5 6 7 8 9 10 11 12 13 14 15 16 17 18 19 20 21 22 23 24 25 26 27 28 29 30 31 32 33 |
package simplequeues; import com.rabbitmq.client.ConnectionFactory; import com.rabbitmq.client.Connection; import com.rabbitmq.client.Channel; import java.io.IOException; import java.util.concurrent.TimeoutException; public class SimpleSend { public static void main(String[] args) throws IOException, TimeoutException { String host="192.168.100.89"; String virtualHost = "/"; String username = "openstack"; String password = "123456"; String QUEUE_NAME="hello"; ConnectionFactory factory = new ConnectionFactory(); factory.setHost(host); factory.setVirtualHost(virtualHost); factory.setUsername(username); factory.setPassword(password); Connection connection = factory.newConnection(); Channel channel = connection.createChannel(); channel.queueDeclare(QUEUE_NAME, false, false, false, null); String message = "Hello World!"; channel.basicPublish("", QUEUE_NAME, null, message.getBytes()); System.out.println(" [x] Sent '" + message + "'"); channel.close(); connection.close(); } } |
SimpleRecv代码如下:
|
1 2 3 4 5 6 7 8 9 10 11 12 13 14 15 16 17 18 19 20 21 22 23 24 25 26 27 28 29 30 31 32 33 34 35 36 |
package simplequeues; import com.rabbitmq.client.*; import java.io.IOException; public class SimpleRecv { private final static String QUEUE_NAME = "hello"; public static void main(String[] argv) throws Exception { String host="192.168.100.89"; String virtualHost = "/"; String username = "openstack"; String password = "123456"; ConnectionFactory factory = new ConnectionFactory(); factory.setHost(host); factory.setVirtualHost(virtualHost); factory.setUsername(username); factory.setPassword(password); Connection connection = factory.newConnection(); Channel channel = connection.createChannel(); channel.queueDeclare(QUEUE_NAME, false, false, false, null); System.out.println(" [*] Waiting for messages. To exit press CTRL+C"); Consumer consumer = new DefaultConsumer(channel) { @Override public void handleDelivery(String consumerTag, Envelope envelope, AMQP.BasicProperties properties, byte[] body) throws IOException { String message = new String(body, "UTF-8"); System.out.println(" [x] Received '" + message + "'"); } }; channel.basicConsume(QUEUE_NAME, true, consumer); } } |
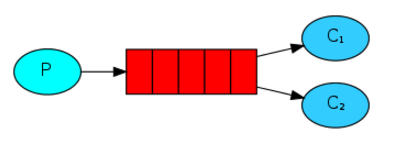
2、工作队列场景(Work queues)
消息确认
任务执行可能需要花费一段时间,如果消费者执行了一个长任务,但执行了一部分时,消费者被杀死,当前设置如果消息被传送,将从内存中移除,如果杀死消费者,正在处理的消息会丢失,另外还会丢失所有被调度到该worker上未被处理的消息。Rabbitmq支持消息确认,消息被处理后,消费者会通过发送ack告诉RabbitMQ该消息可以被删除。
如果消费者进程被杀死,channel 和connection 被关闭,TCP 连接丢失然后无法发送ack,RabbitMQ将知道该消息未被正确处理然后将重新调度。
消息确认默认是打开的,上面例子通过设置关闭,
|
1 |
autoAck=true |
durable 属性:消息是否丢失
任务消息在RabbitMQ服务器停止时仍可以丢失,需要设置消息queue持久性,需要在channel一开始就声明,重新定义会报错。
首先需要声明消息队列的持久性
|
1 2 |
boolean durable = true; channel.queueDeclare("hello", durable, false, false, null); |
消息生产者和消费者都需要设置true
然后设置messages 持久化
|
1 2 3 |
channel.basicPublish("", "task_queue", MessageProperties.PERSISTENT_TEXT_PLAIN, message.getBytes()); |
公平调度
basicQos 配置,一次分发不超过一个消息,即直到worker处理完成才分配消息,或着分配给不忙的work
|
1 2 3 4 |
int prefetchCount = 1; channel.basicQos(prefetchCount); boolean autoAck = false; channel.basicConsume(TASK_QUEUE_NAME, autoAck, consumer); |
NewTask代码如下:
|
1 2 3 4 5 6 7 8 9 10 11 12 13 14 15 16 17 18 19 20 21 22 23 24 25 26 27 28 29 30 31 32 33 34 35 36 37 38 39 40 41 42 43 44 45 46 47 48 49 50 51 52 53 |
package workqueues; import com.rabbitmq.client.Channel; import com.rabbitmq.client.Connection; import com.rabbitmq.client.ConnectionFactory; import com.rabbitmq.client.MessageProperties; public class NewTask { private static final String TASK_QUEUE_NAME = "task_queue"; public static void main(String[] argv) throws Exception { String host="192.168.100.89"; String virtualHost = "/"; String username = "openstack"; String password = "123456"; ConnectionFactory factory = new ConnectionFactory(); factory.setHost(host); factory.setVirtualHost(virtualHost); factory.setUsername(username); factory.setPassword(password); Connection connection = factory.newConnection(); Channel channel = connection.createChannel(); channel.queueDeclare(TASK_QUEUE_NAME, true, false, false, null); String message = getMessage(argv); channel.basicPublish("", TASK_QUEUE_NAME, MessageProperties.PERSISTENT_TEXT_PLAIN, message.getBytes("UTF-8")); System.out.println(" [x] Sent '" + message + "'"); channel.close(); connection.close(); } private static String getMessage(String[] strings) { if (strings.length < 1) return "Hello World!"; return joinStrings(strings, " "); } private static String joinStrings(String[] strings, String delimiter) { int length = strings.length; if (length == 0) return ""; StringBuilder words = new StringBuilder(strings[0]); for (int i = 1; i < length; i++) { words.append(delimiter).append(strings[i]); } return words.toString(); } } |
Worker代码如下:
|
1 2 3 4 5 6 7 8 9 10 11 12 13 14 15 16 17 18 19 20 21 22 23 24 25 26 27 28 29 30 31 32 33 34 35 36 37 38 39 40 41 42 43 44 45 46 47 48 49 50 51 52 53 54 55 56 57 |
package workqueues; import com.rabbitmq.client.*; import java.io.IOException; public class Worker { private static final String TASK_QUEUE_NAME = "task_queue"; public static void main(String[] argv) throws Exception { String host="192.168.100.89"; String virtualHost = "/"; String username = "openstack"; String password = "123456"; ConnectionFactory factory = new ConnectionFactory(); factory.setHost(host); factory.setVirtualHost(virtualHost); factory.setUsername(username); factory.setPassword(password); final Connection connection = factory.newConnection(); final Channel channel = connection.createChannel(); channel.queueDeclare(TASK_QUEUE_NAME, true, false, false, null); System.out.println(" [*] Waiting for messages. To exit press CTRL+C"); channel.basicQos(1); final Consumer consumer = new DefaultConsumer(channel) { @Override public void handleDelivery(String consumerTag, Envelope envelope, AMQP.BasicProperties properties, byte[] body) throws IOException { String message = new String(body, "UTF-8"); System.out.println(" [x] Received '" + message + "'"); try { doWork(message); } finally { System.out.println(" [x] Done"); channel.basicAck(envelope.getDeliveryTag(), false); } } }; channel.basicConsume(TASK_QUEUE_NAME, false, consumer); } private static void doWork(String task) { for (char ch : task.toCharArray()) { if (ch == '.') { try { Thread.sleep(1000); } catch (InterruptedException _ignored) { Thread.currentThread().interrupt(); } } } } } |
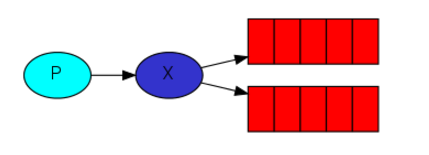
3、发布/订阅场景(Publish/Subscribe)
传递消息给多个消费者
Exchanges
RabbitMQ 中消息模型的关键是producer 从不直接发送消息给消息队列,实际上,producer 甚至一点都不知道消息是否传送给任何的消息队列。
producer 只发送消息给exchange,exchange非常简单,一方面exchange从producer接受消息,另一方面将消息推送到消息队列中,exchange必须准确的知道谁将处理它接受的消息,是否将消息追加到特殊的队列中。是否将消息追加到许多消息队列中。是否将消息丢弃,exchange的类型会定义类型。类型包括:direct, topic, headers 和 fanout
命令行下列出exchanges:
|
1 |
# rabbitmqctl list_exchanges |
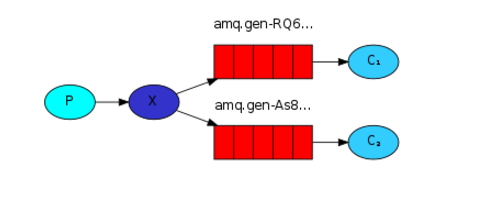
在前两个模式中,我们利用默认的exchange,“”空字符串预示着默认或无名的exchange,消息会被路由到由routingKey指定名称的队列中,
Temporary queues临时队列
之前的示例都指定了队列的名称,生产者和消费者可以通过名称来共享该队列
但在这里不适用我们现在的日志系统,这里日志系统需要收到所有的日志消息,而并非是其中的一部分,我们对当前正在输出的日志消息而不是旧的消息,为了解决这个问题我们需要做两件事情:
首先,无论何时我们连接到Rabbit,我们都需要最新、空队列,为了实现这个,我们可以创建一个名字为随机名字的队列,或者,让Rabbit服务器为我们选择一个随机名字的队列
其次,一旦我们与消费者断开连接,其中队列应该被自动删除。
在Java客户端中,我们利用queueDeclare()创建非持久、独有的、自动删除的队列,该队列具备自动生成的名称。
|
1 |
String queueName = channel.queueDeclare().getQueue(); |
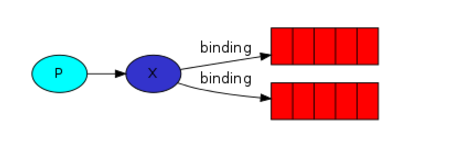
Bindings绑定
目前已经创建了fanout类型的exchange和队列,现在需要告诉exchange 发送消息给消息队列,exchange 和消息队列的关系称为bindings
|
1 |
channel.queueBind(queueName, "logs", ""); |
此时logs exchange会向消息队列中追加消息。
可以通过rabbitmqctl list_bindings命令列出bindings
模型变为
较之前的模式,最大变化是我们现在发布消息logs exchange,而不是无名字的exchange,当发送时需要提供routingKey,但routingKey 的值会被fanout exchanges忽略,
如果没有队列绑定到exchange 中messages 将会丢失。
EmitLog代码如下:
|
1 2 3 4 5 6 7 8 9 10 11 12 13 14 15 16 17 18 19 20 21 22 23 24 25 26 27 28 29 30 31 32 33 34 35 36 37 38 39 40 41 42 43 44 45 46 47 48 49 50 51 52 53 |
package publishsubscribe; import com.rabbitmq.client.BuiltinExchangeType; import com.rabbitmq.client.ConnectionFactory; import com.rabbitmq.client.Connection; import com.rabbitmq.client.Channel; public class EmitLog { private static final String EXCHANGE_NAME = "logs"; public static void main(String[] argv) throws Exception { String host="192.168.100.89"; String virtualHost = "/"; String username = "openstack"; String password = "123456"; ConnectionFactory factory = new ConnectionFactory(); factory.setHost(host); factory.setVirtualHost(virtualHost); factory.setUsername(username); factory.setPassword(password); Connection connection = factory.newConnection(); Channel channel = connection.createChannel(); channel.exchangeDeclare(EXCHANGE_NAME, BuiltinExchangeType.FANOUT); String message = getMessage(argv); channel.basicPublish(EXCHANGE_NAME, "", null, message.getBytes("UTF-8")); System.out.println(" [x] Sent '" + message + "'"); channel.close(); connection.close(); } private static String getMessage(String[] strings){ if (strings.length < 1) return "info: Hello World!"; return joinStrings(strings, " "); } private static String joinStrings(String[] strings, String delimiter) { int length = strings.length; if (length == 0) return ""; StringBuilder words = new StringBuilder(strings[0]); for (int i = 1; i < length; i++) { words.append(delimiter).append(strings[i]); } return words.toString(); } } |
ReceiveLogs代码如下:
|
1 2 3 4 5 6 7 8 9 10 11 12 13 14 15 16 17 18 19 20 21 22 23 24 25 26 27 28 29 30 31 32 33 34 35 36 37 38 39 |
package publishsubscribe; import com.rabbitmq.client.*; import java.io.IOException; public class ReceiveLogs { private static final String EXCHANGE_NAME = "logs"; public static void main(String[] argv) throws Exception { String host="192.168.100.89"; String virtualHost = "/"; String username = "openstack"; String password = "123456"; ConnectionFactory factory = new ConnectionFactory(); factory.setHost(host); factory.setVirtualHost(virtualHost); factory.setUsername(username); factory.setPassword(password); Connection connection = factory.newConnection(); Channel channel = connection.createChannel(); channel.exchangeDeclare(EXCHANGE_NAME, BuiltinExchangeType.FANOUT); String queueName = channel.queueDeclare().getQueue(); channel.queueBind(queueName, EXCHANGE_NAME, ""); System.out.println(" [*] Waiting for messages. To exit press CTRL+C"); Consumer consumer = new DefaultConsumer(channel) { @Override public void handleDelivery(String consumerTag, Envelope envelope, AMQP.BasicProperties properties, byte[] body) throws IOException { String message = new String(body, "UTF-8"); System.out.println(" [x] Received '" + message + "'"); } }; channel.basicConsume(queueName, true, consumer); } } |
4、路由场景(Routing)
订阅消息的子集,比如只订阅错误消息
Bindings
之前的示例中如下生命了绑定
|
1 |
channel.queueBind(queueName, EXCHANGE_NAME, ""); |
但绑定可以添加额外的routingKey 关键字,为了避免与basic_publish混淆,我们称为“ binding key”,创建方式如下:
|
1 |
channel.queueBind(queueName, EXCHANGE_NAME, "black"); |
binding key绑定关键字的意义取决于exchange的类型,fanout类型的exchange会忽略这个值。
Direct exchange
之前的例子是广播所有消息给所有消费者,这里所做的扩展是根据消息的严重性来过滤消息。例如,我们为节省空间,只允许将严重错误的消息保存到磁盘
我们使用fanout exchange不是太灵活,只会无脑的广播,这里我们选择direct exchange,direct exchange背后的路由算法十分简单,如果 消息的binding key和routing key严格匹配,消息会发往该队列。
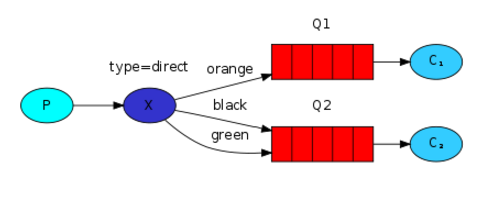
如图,第一个队列绑定关键字为orange,第二个队列有两个绑定关键字black和green,发布的消息带有orange路由关键字的会发往消息队列Q1,black 和green的会发往消息队列Q2,其他消息将会被丢弃。
Multiple bindings多个绑定
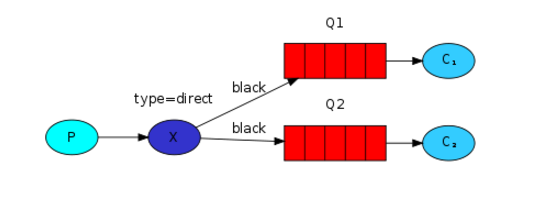
多个队列绑定同一个关键字也是可以的,我们可以在X exchange和Q1之间绑定black关键字,这样direct exchange也和fanout 一样,将广播消息给多个匹配队列。
实现上,首先创建direct exchange
|
1 |
channel.exchangeDeclare(EXCHANGE_NAME, "direct"); |
然后准备好发送消息
|
1 |
channel.basicPublish(EXCHANGE_NAME, severity, null, message.getBytes()); |
假设serverity的有’info’, ‘warning’, ‘error三级
Subscribing 订阅
为每一个所感兴趣的serveriy创建一个新的binding
|
1 2 3 4 |
String queueName = channel.queueDeclare().getQueue(); for(String severity : argv){ channel.queueBind(queueName, EXCHANGE_NAME, severity); } |
整体如下:
EmitLogDirect代码如下:
|
1 2 3 4 5 6 7 8 9 10 11 12 13 14 15 16 17 18 19 20 21 22 23 24 25 26 27 28 29 30 31 32 33 34 35 36 37 38 39 40 41 42 43 44 45 46 47 48 49 50 51 52 53 54 55 56 57 58 59 60 61 |
package routing; import com.rabbitmq.client.BuiltinExchangeType; import com.rabbitmq.client.ConnectionFactory; import com.rabbitmq.client.Connection; import com.rabbitmq.client.Channel; public class EmitLogDirect { private static final String EXCHANGE_NAME = "direct_logs"; public static void main(String[] argv) throws Exception { String host="192.168.100.89"; String virtualHost = "/"; String username = "openstack"; String password = "123456"; ConnectionFactory factory = new ConnectionFactory(); factory.setHost(host); factory.setVirtualHost(virtualHost); factory.setUsername(username); factory.setPassword(password); Connection connection = factory.newConnection(); Channel channel = connection.createChannel(); channel.exchangeDeclare(EXCHANGE_NAME, BuiltinExchangeType.DIRECT); String severity = getSeverity(argv); String message = getMessage(argv); channel.basicPublish(EXCHANGE_NAME, severity, null, message.getBytes("UTF-8")); System.out.println(" [x] Sent '" + severity + "':'" + message + "'"); channel.close(); connection.close(); } private static String getSeverity(String[] strings){ if (strings.length < 1) return "info"; return strings[0]; } private static String getMessage(String[] strings){ if (strings.length < 2) return "Hello World!"; return joinStrings(strings, " ", 1); } private static String joinStrings(String[] strings, String delimiter, int startIndex) { int length = strings.length; if (length == 0 ) return ""; if (length < startIndex ) return ""; StringBuilder words = new StringBuilder(strings[startIndex]); for (int i = startIndex + 1; i < length; i++) { words.append(delimiter).append(strings[i]); } return words.toString(); } } |
ReceiveLogsDirect代码如下:
|
1 2 3 4 5 6 7 8 9 10 11 12 13 14 15 16 17 18 19 20 21 22 23 24 25 26 27 28 29 30 31 32 33 34 35 36 37 38 39 40 41 42 43 44 45 46 |
package routing; import com.rabbitmq.client.*; import java.io.IOException; public class ReceiveLogsDirect { private static final String EXCHANGE_NAME = "direct_logs"; public static void main(String[] argv) throws Exception { String host="192.168.100.89"; String virtualHost = "/"; String username = "openstack"; String password = "123456"; ConnectionFactory factory = new ConnectionFactory(); factory.setHost(host); factory.setVirtualHost(virtualHost); factory.setUsername(username); factory.setPassword(password); Connection connection = factory.newConnection(); Channel channel = connection.createChannel(); channel.exchangeDeclare(EXCHANGE_NAME, BuiltinExchangeType.DIRECT); String queueName = channel.queueDeclare().getQueue(); if (argv.length < 1){ System.err.println("Usage: ReceiveLogsDirect [info] [warning] [error]"); System.exit(1); } for(String severity : argv){ channel.queueBind(queueName, EXCHANGE_NAME, severity); } System.out.println(" [*] Waiting for messages. To exit press CTRL+C"); Consumer consumer = new DefaultConsumer(channel) { @Override public void handleDelivery(String consumerTag, Envelope envelope, AMQP.BasicProperties properties, byte[] body) throws IOException { String message = new String(body, "UTF-8"); System.out.println(" [x] Received '" + envelope.getRoutingKey() + "':'" + message + "'"); } }; channel.basicConsume(queueName, true, consumer); } } |
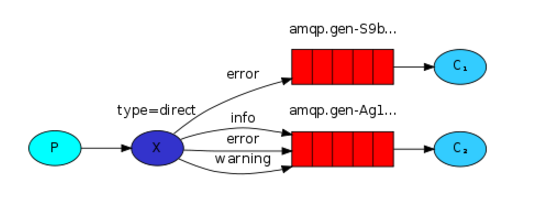
5、主题场景(Topics)
尽管direct exchange 可以提升我们的系统,但其在基于多规则场景下仍具有一些局限性。
在我们的日志系统示例中,我们不仅关系日志的严重级别,我们还关心日志发送的来源,可能你已经熟悉syslog的一些概念,syslog的日志路由不仅包括日志的严重性(info/warn/crit…) ,还包括装置信息(auth/cron/kern…)。这将增更多的灵活性,我们不仅需要监听来源于定时任务cron的一些关键错误,还要监听内核的一些关键错误。
为了实现我们的日志系统,我们必须了解更复杂的topic exchange
Topic exchange
发往topic exchange的消息不能有任意的routing_key,必须罗列一些关键词,并用.号分割,关键词一般具备消息的一些特征,示例如“stock.usd.nyse”, “nyse.vmw”, “quick.orange.rabbit”,routing key 可以罗列多个关键字,但上限是255字节。
binding key必须也是相同形式,同direct exchange类似,topic exchange会发送携带特定的routing key 的消息给绑定匹配 binding key的消息队列。但这里具有两个重要但特殊的 binding key示例
*星号可以替代只有一个关键词;
#哈希可以替代0个或者多个关键词。
示例如下:
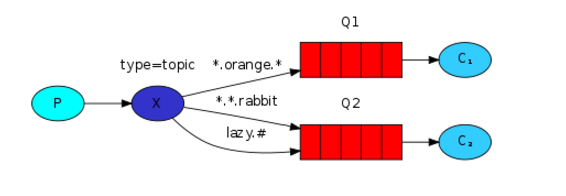
在这个例子中,我们发送全用来描述动物的消息,消息将发送一个由三个关键词(和两个点号)组成的routing key,routing key的第一个关键词描述速度,第二个关键词描述颜色,第三个描述种类,即 “<speed>.<colour>.<species>”。
我们建立了三个绑定,Q1绑定 “<speed>.<colour>.<species>”,Q2绑定”*.*.rabbit”和 “lazy.#”。即Q1对橘黄色的动物感兴趣,Q2对所有兔子和懒惰的动物感兴趣。
所有与之匹配的消息会进入相应的消息队列,否则会被丢弃。特别的,”orange” 或者 “quick.orange.male.rabbit”不会进入消息队列Q1, “lazy.orange.male.rabbit”不会进入Q1,但会进入Q2。
Topic exchange作用十分强大,可以实现其他类型的exchanges。当一个队列绑定”#” (hash) 的binding keys,将接受所有信息,而不再去匹配routing key,同 fanout exchange一样。
绑定中如果不具备”*” (star) 和 “#” (hash) 时,这将类似与direct exchange。
EmitLogTopic代码如下:
|
1 2 3 4 5 6 7 8 9 10 11 12 13 14 15 16 17 18 19 20 21 22 23 24 25 26 27 28 29 30 31 32 33 34 35 36 37 38 39 40 41 42 43 44 45 46 47 48 49 50 51 52 53 54 55 56 57 58 59 60 61 62 63 64 65 66 67 68 69 70 71 |
package topic; import com.rabbitmq.client.BuiltinExchangeType; import com.rabbitmq.client.ConnectionFactory; import com.rabbitmq.client.Connection; import com.rabbitmq.client.Channel; public class EmitLogTopic { private static final String EXCHANGE_NAME = "topic_logs"; public static void main(String[] argv) { String host="192.168.100.89"; String virtualHost = "/"; String username = "openstack"; String password = "123456"; Connection connection = null; Channel channel = null; try { ConnectionFactory factory = new ConnectionFactory(); factory.setHost(host); factory.setVirtualHost(virtualHost); factory.setUsername(username); factory.setPassword(password); connection = factory.newConnection(); channel = connection.createChannel(); channel.exchangeDeclare(EXCHANGE_NAME, BuiltinExchangeType.TOPIC); String routingKey = getRouting(argv); String message = getMessage(argv); channel.basicPublish(EXCHANGE_NAME, routingKey, null, message.getBytes("UTF-8")); System.out.println(" [x] Sent '" + routingKey + "':'" + message + "'"); } catch (Exception e) { e.printStackTrace(); } finally { if (connection != null) { try { connection.close(); } catch (Exception ignore) {} } } } private static String getRouting(String[] strings){ if (strings.length < 1) return "anonymous.info"; return strings[0]; } private static String getMessage(String[] strings){ if (strings.length < 2) return "Hello World!"; return joinStrings(strings, " ", 1); } private static String joinStrings(String[] strings, String delimiter, int startIndex) { int length = strings.length; if (length == 0 ) return ""; if (length < startIndex ) return ""; StringBuilder words = new StringBuilder(strings[startIndex]); for (int i = startIndex + 1; i < length; i++) { words.append(delimiter).append(strings[i]); } return words.toString(); } } |
ReceiveLogsTopic代码如下:
|
1 2 3 4 5 6 7 8 9 10 11 12 13 14 15 16 17 18 19 20 21 22 23 24 25 26 27 28 29 30 31 32 33 34 35 36 37 38 39 40 41 42 43 44 45 46 47 |
package topic; import com.rabbitmq.client.*; import java.io.IOException; public class ReceiveLogsTopic { private static final String EXCHANGE_NAME = "topic_logs"; public static void main(String[] argv) throws Exception { String host="192.168.100.89"; String virtualHost = "/"; String username = "openstack"; String password = "123456"; ConnectionFactory factory = new ConnectionFactory(); factory.setHost(host); factory.setVirtualHost(virtualHost); factory.setUsername(username); factory.setPassword(password); Connection connection = factory.newConnection(); Channel channel = connection.createChannel(); channel.exchangeDeclare(EXCHANGE_NAME, BuiltinExchangeType.TOPIC); String queueName = channel.queueDeclare().getQueue(); if (argv.length < 1) { System.err.println("Usage: ReceiveLogsTopic [binding_key]..."); System.exit(1); } for (String bindingKey : argv) { channel.queueBind(queueName, EXCHANGE_NAME, bindingKey); } System.out.println(" [*] Waiting for messages. To exit press CTRL+C"); Consumer consumer = new DefaultConsumer(channel) { @Override public void handleDelivery(String consumerTag, Envelope envelope, AMQP.BasicProperties properties, byte[] body) throws IOException { String message = new String(body, "UTF-8"); System.out.println(" [x] Received '" + envelope.getRoutingKey() + "':'" + message + "'"); } }; channel.basicConsume(queueName, true, consumer); } } |
6、远程调用场景(RPC)
利用RabbitMQ 构建RPC系统,一个客户端和可扩展的RPC服务器端。现在利用返回斐波那契数据来模拟RPC服务。
客户端接口
RPC在计算机领域是常用的一种模式,但其常具争议。问题出现在当程序员不知道程序调用是在本地还是在远程。在不可预知的系统中会导致混乱,并增加了调试的复杂性。利用RPC取代简单软件会导致无法维护复杂代码(spaghetti code)。为此,请记住以下建议:
确保方法能够明确显示它是本地调用还是远程调用。
记录系统,确保组件间的依赖足够清晰
处理错误的情况,当RPC 服务器端长时间无反应时,client端该如何响应。
当拿不准是否避免RPC时,如果可以避免,应该利用异步通道来取代RPC。像阻塞,在进行到下一个计算阶段之前结果是异步的。
Callback队列
一般情况下,在RabbitMQ中执行RPC非常简单,客户端发送请求消息,服务器端回复响应消息。为了接受“响应”,我们应该发送在请求中发送“callback”队列地址。
|
1 2 3 4 5 6 |
callbackQueueName = channel.queueDeclare().getQueue(); BasicProperties props = new BasicProperties .Builder() .replyTo(callbackQueueName) .build(); channel.basicPublish("", "rpc_queue", props, message.getBytes()); |
附消息属性
AMQP 0-9-1协议定义了14个消息属性,大部分属性很少使用,以下例外:
deliveryMode:消息是否持久还是瞬间状态;
contentType:用来描述自定义的编码,例如使用JSON 编码,可以设置属性为:application/json.
replyTo:一般用来命名回调队列
correlationId:关联RPC对请求的相应非常有用。
Correlation Id
在此方法中,我们建议为每个RPC请求创建回调队列。这个效率非常的低,但幸运的是有更好的方法,即为每个客户端创建单独的调用队列。
这会引起新的问题,在队列中已经收到了响应,但不清楚该响应属于那个请求。这时候应该使用correlationId 属性。需要为每个请求设置唯一的值,但接收到回调队列的消息时,我们将查看该属性。基于该属性,我们可以匹配响应所属的请求。如果发现未知的correlationId 值,这是可以丢弃不属于我们请求的响应。
这里可能有疑问,为什么我们应该忽略回调队列中未知消息,而非抛出错误?这是因为在服务器端存在竞争条件的可能性,尽管不大可能会发生,但RPC 服务器可能在刚发送给我们回复时宕机,但尚未发送请求的确认消息,如果这种情景发生,重启的RPC 服务器将再重新处理该请求,这是为什么在客户端我们必须正常处理重复的响应。并且RPC应该在理论上保持幂等性的原因。

当客户端启动时,它创建了匿名的、独特的回调队列,对于RPC请求,客户端应该发送两个属性:replyTo和correlationId,replyTo用来设定回调队列,correlationId用来设定每个请求的唯一性。
请求会发送给rpc_queue 队列
RPC worker 即服务器端等待rpc_queue的队列,当请求发生时,会执行job,并通过replyTo所指定的队列,将结果信息发生给客户端。
客户端等待回调结果数据,当消息出现时,它会检查correlationId 属性,如果可以匹配请求中的值,那么它将返回程序的响应值。
RPCServer服务器端代码如下:
|
1 2 3 4 5 6 7 8 9 10 11 12 13 14 15 16 17 18 19 20 21 22 23 24 25 26 27 28 29 30 31 32 33 34 35 36 37 38 39 40 41 42 43 44 45 46 47 48 49 50 51 52 53 54 55 56 57 58 59 60 61 62 63 64 65 66 67 68 69 70 71 72 73 74 75 76 77 78 79 80 81 82 83 84 85 |
package rpc; import com.rabbitmq.client.ConnectionFactory; import com.rabbitmq.client.Connection; import com.rabbitmq.client.Channel; import com.rabbitmq.client.Consumer; import com.rabbitmq.client.DefaultConsumer; import com.rabbitmq.client.AMQP; import com.rabbitmq.client.Envelope; import java.io.IOException; import java.util.concurrent.TimeoutException; public class RPCServer { private static final String RPC_QUEUE_NAME = "rpc_queue"; private static int fib(int n) { if (n == 0) return 0; if (n == 1) return 1; return fib(n-1) + fib(n-2); } public static void main(String[] argv) { String host="192.168.100.89"; String virtualHost = "/"; String username = "openstack"; String password = "123456"; ConnectionFactory factory = new ConnectionFactory(); factory.setHost(host); factory.setVirtualHost(virtualHost); factory.setUsername(username); factory.setPassword(password); Connection connection = null; try { connection = factory.newConnection(); Channel channel = connection.createChannel(); channel.queueDeclare(RPC_QUEUE_NAME, false, false, false, null); channel.basicQos(1); System.out.println(" [x] Awaiting RPC requests"); Consumer consumer = new DefaultConsumer(channel) { @Override public void handleDelivery(String consumerTag, Envelope envelope, AMQP.BasicProperties properties, byte[] body) throws IOException { AMQP.BasicProperties replyProps = new AMQP.BasicProperties .Builder() .correlationId(properties.getCorrelationId()) .build(); String response = ""; try { String message = new String(body,"UTF-8"); int n = Integer.parseInt(message); System.out.println(" [.] fib(" + message + ")"); response += fib(n); } catch (RuntimeException e){ System.out.println(" [.] " + e.toString()); } finally { channel.basicPublish( "", properties.getReplyTo(), replyProps, response.getBytes("UTF-8")); channel.basicAck(envelope.getDeliveryTag(), false); } } }; channel.basicConsume(RPC_QUEUE_NAME, false, consumer); //loop to prevent reaching finally block while(true) { try { Thread.sleep(100); } catch (InterruptedException _ignore) {} } } catch (IOException | TimeoutException e) { e.printStackTrace(); } finally { if (connection != null) try { connection.close(); } catch (IOException _ignore) {} } } } |
通常,我们通过建立连接、channel 、和声明队列来开始,我们可能想运行不止一个的服务器进程,为了将负载分布到多个服务器上,我们需要在channel.basicQos中设置预取消息个数prefetchCount的值。
我们使用basicConsume 来获取队列,以DefaultConsumer将执行任务并返回响应来提供回调。
RPCClient客户端代码如下:
|
1 2 3 4 5 6 7 8 9 10 11 12 13 14 15 16 17 18 19 20 21 22 23 24 25 26 27 28 29 30 31 32 33 34 35 36 37 38 39 40 41 42 43 44 45 46 47 48 49 50 51 52 53 54 55 56 57 58 59 60 61 62 63 64 65 66 67 68 69 70 71 72 73 74 75 76 77 78 79 80 81 82 83 84 85 86 87 88 89 |
package rpc; import com.rabbitmq.client.ConnectionFactory; import com.rabbitmq.client.Connection; import com.rabbitmq.client.Channel; import com.rabbitmq.client.DefaultConsumer; import com.rabbitmq.client.AMQP; import com.rabbitmq.client.Envelope; import java.io.IOException; import java.util.UUID; import java.util.concurrent.ArrayBlockingQueue; import java.util.concurrent.BlockingQueue; import java.util.concurrent.TimeoutException; public class RPCClient { private Connection connection; private Channel channel; private String requestQueueName = "rpc_queue"; private String replyQueueName; public RPCClient() throws IOException, TimeoutException { String host="192.168.100.89"; String virtualHost = "/"; String username = "openstack"; String password = "123456"; ConnectionFactory factory = new ConnectionFactory(); factory.setHost(host); factory.setVirtualHost(virtualHost); factory.setUsername(username); factory.setPassword(password); connection = factory.newConnection(); channel = connection.createChannel(); replyQueueName = channel.queueDeclare().getQueue(); } public String call(String message) throws IOException, InterruptedException { String corrId = UUID.randomUUID().toString(); AMQP.BasicProperties props = new AMQP.BasicProperties .Builder() .correlationId(corrId) .replyTo(replyQueueName) .build(); channel.basicPublish("", requestQueueName, props, message.getBytes("UTF-8")); final BlockingQueue<String> response = new ArrayBlockingQueue<String>(1); channel.basicConsume(replyQueueName, true, new DefaultConsumer(channel) { @Override public void handleDelivery(String consumerTag, Envelope envelope, AMQP.BasicProperties properties, byte[] body) throws IOException { if (properties.getCorrelationId().equals(corrId)) { response.offer(new String(body, "UTF-8")); } } }); return response.take(); } public void close() throws IOException { connection.close(); } public static void main(String[] argv) { RPCClient fibonacciRpc = null; String response = null; try { fibonacciRpc = new RPCClient(); System.out.println(" [x] Requesting fib(30)"); response = fibonacciRpc.call("30"); System.out.println(" [.] Got '" + response + "'"); } catch (IOException | TimeoutException | InterruptedException e) { e.printStackTrace(); } finally { if (fibonacciRpc!= null) { try { fibonacciRpc.close(); } catch (IOException _ignore) {} } } } } |
客户端代码略微有点复杂,建立连接、channel、声明回复的“callback”队列。订阅该回调队列,以便接受RPC响应。调用方法发起RPC请求,首先生成correlationId,并保存,在DefaultConsumer 中实现handleDelivery ,利用该值捕获合适的响应,
接下来,我们发布请求信息,携带replyTo 和correlationId属性,然后等待返回,
因为我们的consumer delivery 处理碰巧是一个单独的线程,我们在响应到来之前需要一些东西来挂起主线程,使用BlockingQueue是一个解决方法,这里通过使用ArrayBlockingQueue ,设置1预示着我们需要等待一个响应。
handleDelivery 方法做了一件非常简单的工作,会对每个已经处理的请求响应进行检查,如果correlationId 与当前所要寻找的值匹配,就将响应放入BlockingQueue中。
同时,主线程等待从BlockingQueue所取出的响应。最后将响应返回个用户。
这里的设计不仅实现的远程调用服务,还具有一些非常重要的优势:
如果RPC服务器非常慢,可以扩展成两个,可以在新的终端中运行第二个RPCServer
在客户端,RPC需要发送并只接受一个消息,不像queueDeclare 那样需要同步调用,这可以使RPC客户端执行RPC请求只需要一次网络请求过程。
代码非常简单,不要以期解决如下的复杂问题:
如果服务器无法运行时,客户端该如何响应?
对于RPC,客户端是否应该有某种超时情况?
如果服务器端反生错误或抛出异常,是否转发给客户端?
在处理之前如何避免无效的涌入消息(例如通过检测bounds和类型)
三、源码及参考文档
客户端代码:
https://github.com/zjmeixinyanzhi/RabbitMQDev
https://github.com/rabbitmq/rabbitmq-tutorials/tree/master/java
官方文档:


codemore code
~~~~